Redefining Your Shelf Layout with Themed Dioramas

Building Custom Terrain Bases
Using Scale-Appropriate Props
Layering Backdrops for Depth
Integrating LED Lighting Effects
Creating Narrative-Driven Scenes
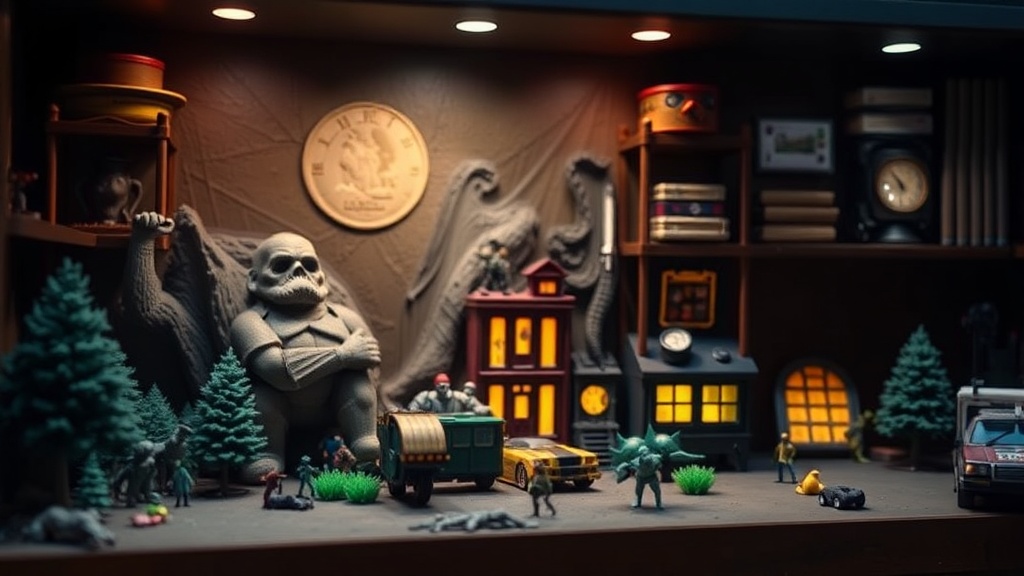
Imagine a collector walks into a room filled with hundreds of figures, but every single one is lined up in a single, flat row on a shelf. It looks organized, sure, but it feels static—almost like a grocery store aisle rather than a collection. This lack of depth makes even the most expensive McFarlane sculpts look like mere plastic toys instead of pieces of art. This post explores how you can use themed dioramas to break that monotony and turn a simple display into a living scene.
Most collectors eventually hit a wall where adding more figures just feels like clutter. You've got the same white shelves, the same LED strips, and the same sense of "more of the same." Dioramas change the math. They provide a sense of scale, context, and storytelling that a simple shelf cannot provide. Whether you're into the gritty streets of Gotham or the high-fantasy realms of various fantasy lines, your display should tell a story.
How Can I Create a Themed Diorama for My Figures?
You can create a themed diorama by combining physical terrain elements, lighting, and background-appropriate accessories to build a cohesive scene. It isn't just about sticking a figure next to a rock; it's about creating an environment. If you're working with a highly detailed line like the classic McFarlane Toys sculpts, the environment needs to match that level of grit and texture.
Start with a base. You shouldn't just use a flat surface. A textured base gives the figure something to interact with. If you're building a post-apocalyptic scene, you want rubble. If it's a forest, you want moss. You can even use scraps from old model kits or foam-based terrain used in tabletop gaming. (Pro tip: high-density foam is your best friend here.)
The layers are what matter. A flat scene is boring. A great diorama uses verticality. Use some old books or wooden blocks hidden under a cloth or "dirt" to create different heights. This allows you to place a figure on a "ledge" or a "cliff," making the display feel three-dimensional. It pulls the eye upward and makes the collection look much more expensive than it actually is.
Don't forget the background. A blank wall behind your figures kills the immersion. Even a simple printed backdrop or a textured fabric can change the entire vibe. If you want to get serious, look into professional photography backdrops or even high-quality cardstock. It acts as the "sky" or the "interior" of the room, providing the context the figure needs to exist.
Essential Diorama Components
- The Base: The foundation of your scene (foam, wood, or plastic).
- The Terrain: Elements like rocks, debris, or vegetation.
- The Backdrop: The visual setting (a printed sky, a brick wall, or a dark void).
- The Lighting: Small LED lights or even a single-colored light source to set the mood.
- The Scale Props: Small items that match your figure's scale (crates, barrels, or weapons).
What Are the Best Materials for Custom Dioramas?
The best materials for custom dioramas are lightweight, easy to paint, and highly versatile, such as XPS foam, EVA foam, and acrylic-based paints. You want materials that won't damage your figures if they happen to touch them during a display change.
XPS foam (the pink or blue stuff used in model railroading) is the gold standard. It’s easy to carve with a hobby knife, and you can create incredibly realistic rock textures by dabbing it with a sponge or a wire brush. It’s cheap, and it holds paint beautifully. If you’re working on a budget, even scrap cardboard can be turned into "metal" plating or "stone" walls once it's primed and painted.
When it comes to paint, stick to acrylics. They are water-based and generally safer for the environment of your room. If you're building something heavy-duty, you might want to look at how dioramas are traditionally constructed in museums, which often involves more permanent resins, but for a home collection, lightweight and easy-to-modify is the way to go. You'll want to be able to swap out pieces as your collection grows.
| Material | Pros | Cons | Best For |
|---|---|---|---|
| XPS Foam | Incredibly easy to carve; lightweight. | Can be fragile if not coated. | Rocks, cliffs, and ruins. |
| EVA Foam | Very durable; great for "tech" looks. | Harder to texture than XPS. | Sci-fi floors or futuristic walls. |
| Polymer Clay | Extreme detail possible. | Heavy and requires baking. | Small, specific props (bones, skulls). |
| Acrylic Paint | Infinite color options; dries fast. | Can peel if surface isn't prepped. | Everything! |
If you're worried about the long-term health of your display, remember that certain materials can off-gas or react with your figures. This is why I always suggest managing humidity and air quality in your display area. You don't want your custom-built terrain to introduce moisture or chemicals that might affect the paint on your premium figures.
How Do I Organize My Dioramas by Theme?
The most effective way to organize your dioramas is to group them by specific "micro-environments" rather than just a single long shelf. This prevents the "toy store" look and creates distinct "scenes" that feel like curated exhibits.
Think about your collection in terms of "zones." You might have a "Gritty Urban" zone for your street-level figures, a "High Fantasy" zone for your more ornate pieces, and a "Void" zone for your more abstract or minimalist sculpts. Instead of one long shelf of 50 figures, you might have three distinct dioramas of 15-20 figures each. This makes the collection feel much more intentional.
A common mistake is trying to make one giant diorama that covers everything. That's a recipe for a mess. It's much better to have small, focused scenes. A single crate, a bit of rubble, and a single figure can be more powerful than a whole room of junk. It creates a focal point. It forces the viewer to actually look at the figure's pose and the story it's telling.
If you find yourself running out of room, don't just cram things in. When you're running out of space, it's a sign you need to refine your themes. Maybe it's time to move some pieces to a different shelf or a dedicated display case. A cluttered diorama loses its impact. You want every piece to have room to breathe—literally and figuratively.
One thing to keep in mind is the "scale drift." If you're mixing different brands, ensure the scale of your diorama props matches your figures. A 1:12 scale crate looks weird next to a 1:18 scale figure. It breaks the illusion instantly. Always check your scales before you start gluing things down.
If you're looking for more ways to find unique pieces to add to your scenes, you might enjoy reading about finding hidden gems in thrift stores. Sometimes the best diorama pieces aren't sold in the toy aisle, but in the junk bin of a local shop.
Building dioramas is a skill that develops over time. Don't feel like you need to build a masterpiece on day one. Start with a single figure and a small piece of textured foam. See how it looks under a light. Adjust the angle. The goal isn't just to show off what you own, but to show off the world your figures live in.